
HOWTO: Installing MySQL 4.x on WinXP
Posted : July 2, 2004 at 5:19 pm [America/Los_Angeles]

Goal:
Install MySQL on Windows XP using a binary distribution (one with an installer) available from MySQL AB
Assumptions:
- Softwares are installed in a non-OS drive (D:\, for example) and is installed in D:\development-root\tools. If you only have one drive (D:\) or you choose to install MySQL in a different location, replace all the references to D:\development-root\tools below with whatever your install root dir happens to be.
- You know a thing or two about SQL

Gory Details:
- Download your favorite MySQL version. In my case, it’s MySQL 4.1.3 beta.
- Install the binary by double-clicking on setup.exe and answering the prompts appropriately. Install the software in D:\development-root\tools\mysql-4.1.3-beta.
- After MySQL installation is complete, we need to make a few edits to the System Variables. To do that, right-click on My Computer, select Properties, click on the tab titled Advanced and then click on the button at the bottom of this tab titled Environment Variables. Make the following edits to the System variables :
- Add MYSQL_HOME as a System variable and set it to D:\development-root\tools\mysql-4.1.3-beta
- Put %MYSQL_HOME%\bin in your System PATH
- Bring up a DOS prompt and type:
(DOS)>set
Make sure that MYSQL_HOME and PATH variables are properly reflected
- Create a file called my.cnf in C:\ looking something like:
[mysqld]
basedir=E:/development-root/tools/mysql-4.1.3-beta
datadir=E:/development-root/tools/mysql-4.1.3-beta/data
Note:
It’s easy to not notice that the paths in the file are seperated by a ‘/’ and not a ‘\’ as one would expect. I had to spend some time trying to figure out why things were not working cause I had used the ‘\’ as the seperator. You can use a ‘\’, but then you will have to double each ‘\’ up, an option that I did not chose for obvious reasons. - Change your current directory to %MYSQL_HOME%\bin:
cd %MYSQL_HOME%bin
- Just to test if MySQL is properly installed, we will do a quick test run:
(DOS)>mysqld-nt --console
When the server finishes its startup sequence, you should see something like this, which indicates that the server is ready to service client connections:
mysqld-nt: ready for connections.
Version: '4.1.3-beta-nt'  socket: ''  port: 3306
Type Ctrl+C to quit the service.
- Now that we’ve successfully tested the MySQL daemon install, move C:\my.cnf to MYSQL_HOME. You will see why in the Note section of next step.
- Let’s set up MySQL daemon as a Win service. To do that, run the following command:
(DOS)>mysqld-nt --install MySQL4 --defaults-file=D:development-roottoolsmysql-4.1.3-betamy.cnf
Note:
1. –install MySQL4 sets the service name as ‘MySQL4′.
2. –defaults-file makes MySQL daemon use the [mysqld] section of the specified file to configure the daemon as opposed to the default files (like C:\my.cnf, C:\Windows\my.ini, C:\winnt\my.ini). We could have left the my.cnf file under C:\ drive, but I prefer keeping all paraphernalias related to a software in one place for easier maintenance. This should explain the reason of step# 8 above
3. To test whether the service was installed or not, go to Start | Settings | Control Panel | Administrative Tools | Services and look for a service called ‘MySQL4′.
4. If you wanted to name the service differently or change the path of the –defaults-file, you can uninstall the service by running:
(DOS)>mysqld-nt –remove
and reinstall the service (using the command above) after making your necessary edits - Create mysql-startup.bat and mysql-shutdown.bat in %MYSQL_HOME%\bin as shown below.
mysql-startup.bat:net start MySQL4 pause
mysql-shutdown.bat:
net stop MySQL4
pause
- Create a shortcut of mysql-startup.bat and mysql-shutdown.bat on the XP Quick Launch bar as shown below:
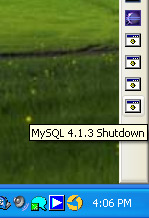
Test the shortcuts out and make sure that the service can be started and stopped using a single mouse-click.
- Let’s start the service up and perform some post-installation steps in order to verify that everything is working fine, at least so far. After the service is running, run the following command:
(DOS)> mysqlshow
+-----------+
| Databases |
+-----------+
| mysql     |
| test      |
+-----------+
- For reasons beyond the comprehension of my puny little brain, the default install of MySQL on WinXP is extremely insecure as you will see below.
Basically, Windows-based distributions contain pre-initialized grant tables that are installed automatically. The grant tables define the initial MySQL user accounts and their access privileges. These accounts are set up as follows:
- Two accounts are created with a username of ‘root’. One root account is for connecting from the local host and the other allows connections from any host. The initial root account
passwords are empty, so anyone can connect to the MySQL server as root without a password and be granted all privileges. - Two anonymous-user accounts are created, each with an empty username. The anonymous accounts have no passwords, so anyone can use them to connect to the MySQL server. One anonymous account is for connections from the local host. It has all privileges, just like the root accounts. The other is for connections from any host and has all privileges for the test database or other databases with names that start with test.
Bottomline, if you installed MySQL as a service, the default install essentially allows anyone to connect to the MySQL database on your computer from anywhere with root privileges using ‘root’ as userid and an empty password. This is, to say the least, insane! Anyway, so we need to fix this.
First, let’s remove the all anonymous access:
DOS> mysql -u root
mysql>DELETE FROM mysql.user WHERE User = '';
mysql>FLUSH PRIVILEGES;
mysql>exit;
Now, try running
DOS>mysql
ERROR 1045 (28000): Access denied for user 'ODBC'@'localhost' (using password: NO)
Cool, so the Anonymous accounts are history!
Let’s add a password to the ‘root’ account
DOS> mysql -u root
mysql> SET PASSWORD FOR 'root'@'localhost' = PASSWORD('newpwd');
mysql> SET PASSWORD FOR 'root'@'%' = PASSWORD('newpwd');
mysql>FLUSH PRIVILEGES;
mysql>exit;
Now, let’s try running:
DOS>mysql -u root
ERROR 1045 (28000): Access denied for user 'root'@'localhost' (using password: NO)
Sweet! The empty root password is gone. Try running this:
DOS>mysql -u root -p
It should prompt you for a password. Enter the password. If you get the mysql> prompt, Congratulations!!!
You’ve a fully functional and secure MySQL setup on WinXP - Two accounts are created with a username of ‘root’. One root account is for connecting from the local host and the other allows connections from any host. The initial root account
- Let’s setup a database and an account which can be used for future Java development. Here’s how you
do it:
DOS>mysql -u root -p
mysql>CREATE DATABASE eclipse;
mysql>GRANT ALL PRIVILEGES ON eclipse.* TO eclipse@localhost IDENTIFIED BY 'ecl1pse';
mysql>exit;
- Test it out:
DOS>mysql -u eclipse -p
mysql>use mysql;
ERROR 1044 (42000): Access denied for user 'eclipse'@'localhost' to database 'mysql'
mysql>use eclipse;
mysql>create table test (id int, fname varchar (100), lname varchar(100));
mysql>insert into test values (1, 'Anand', 'Sharma');
mysql> select * from test;
+------+-------+--------+
| id   | fname | lname  |
+------+-------+--------+
|    1 | Anand | Sharma |
+------+-------+--------+
1 row in set (0.00 sec)

mysql>
As expected, the user eclipse has access only to eclipse database. Hence the access denied error when the user attempted to use mysql database. Rest of the stuff should be pretty self-explanatory.
HTH
Note:
Please don’t use the userid/password (eclipse/ecl1pse) given above. Change it, and be creative about choosing these, especially if your box is connected to the internet. Lord knows we already have enough vulnerable machines/softwares in the world. I certainly don’t want to contribute to an already insecure computing world
- Anand
Category: Services and Software
4 Comments
Great tutorial. I was “trucking” along until step 12. Everything I did looked just as expected, but then when I ran mysqlshow I only had one db listed, test.
Should I be alarmed? Here is some info on my version:
C:\mysql\bin>mysqladmin version
mysqladmin Ver 8.40 Distrib 4.0.20a, for Win95/Win98 on i32
Copyright (C) 2000 MySQL AB & MySQL Finland AB & TCX DataKonsult AB
This software comes with ABSOLUTELY NO WARRANTY. This is free software,
and you are welcome to modify and redistribute it under the GPL license
Server version 4.0.20a-nt
Protocol version 10
Connection localhost via TCP/IP
TCP port 3306
Uptime: 3 min 56 sec
Threads: 1 Questions: 8 Slow queries: 0 Opens: 6 Flush tables: 1 Open table
s: 0 Queries per second avg: 0.034
Thanks…
Posted by: Erik Weibust at July 14, 2004 @ 2:16 pm
Further, adding to my previous comment.
There were a number of cmds recommended in the MySql manual in section 2.2.1.8 that showed some interesting output.
C:\> C:\mysql\bin\mysqlshow - this only showed the test db.
C:\> C:\mysql\bin\mysqlshow -u root mysql - this showed the tables: columns_priv, db, func, host, tables_priv, and user (I’m assuming those are tables in the mysql db that doesn’t show up when I issue the mysqlshow cmd)
C:\> C:\mysql\bin\mysqladmin version status proc - when I run this I get an error saying I don’t have the appropiate privellages to run the proc cmd/option
Posted by: Erik Weibust at July 15, 2004 @ 5:54 am
Erik:
Pls. accept my sincerest apologies. I was taking some time off from blog world (blogging as well reading other people’s blogs) after my posts yesterday. Hence, the procrastination.
With that said, let me start sequentially:
1. Reply to your first comment:
I am surprised that when you run mysqlshow (Step 12), you see only one db listed - ‘test’. However, your second comment shows that you do have the ‘mysql’ database, so I am willing to guess that the ‘anonymous’ account in 4.0.20a version of MySQL does not have privileges to the ‘mysql’ db (which is great btw). Try running mysqlshow as:
DOS>mysqlshow -u root -p
(provided you’ve set a password for ‘root’, if not just remove -p) and see if the both the dbs show up. If they do, your installation is just fine.
The output for ‘mysqladmin version’ looks fine to me.
2. Reply to your second comment:
a. Again, mysqlshow showing just the ‘test’ db should not be a problem for reasons shared previously.
b. The fact that mysqlshow -u root mysql lists the tables of the ‘mysql’ db leads me to believe that your installation is just fine. When you run a command as ‘root’ (superuser), things look just fine (which is the way it should be anyway).
c. The reason (DOS>mysqladmin version status proc) is failing is probably because the ‘anonymous’ account does not have those privileges. Don’t worry about this.
Frankly, you should not be running even a single mysql command without specifying the user that you want to run it as (by adding a - u <userid> -p to your mysql commands).
After step 13, the ‘anonymous’ account (present by default) will be deleted and commands like:
DOS>mysqlshow
DOS>mysqladmin version
will all stop working, which is precisely what you want, from a security standpoint. I cannot emphasize this enough. Anonymous account is great for starters, but you really don’t need it. Always, always remember to specify which user you want to run the command as and all will be good. That is precisely the reason for my nuking the ‘Anonymous’ account in step 13.
Thanks for the comments, Erik. Seems like MySQL 4.0.20 probably has different default privs for the anonymous account when compared with 4.1.x version.
Posted by: Anand Sharma at July 15, 2004 @ 10:20 am
Thank you weary much on this HOWTO!
Tomislav
Posted by: Tomislav at June 16, 2005 @ 6:53 am